airflow基础教程
[toc]
Airflow
一、airflow安装
1.1 本地运行
1.1.1 快速开始
运行一下命令后, Airflow将创建$AIRFLOW_HOME文件夹并使用默认设置创建“ airflow.cfg”文件
网络服务器的PID文件将被存储在$AIRFLOW_HOME/airflow-webserver.pid或者/run/airflow/webserver.pid
# airflow needs a home, ~/airflow is the default,
# but you can lay foundation somewhere else if you prefer
# (optional)
export AIRFLOW_HOME=~/airflow

AIRFLOW_VERSION=2.1.0
PYTHON_VERSION="$(python --version | cut -d " " -f 2 | cut -d "." -f 1-2)"
# For example: 3.6
CONSTRAINT_URL="https://raw.githubusercontent.com/apache/airflow/constraints-${AIRFLOW_VERSION}/constraints-${PYTHON_VERSION}.txt"
# For example: https://raw.githubusercontent.com/apache/airflow/constraints-2.1.0/constraints-3.6.txt
pip install "apache-airflow==${AIRFLOW_VERSION}" --constraint "${CONSTRAINT_URL}"

# initialize the database
airflow db init

airflow users create \
    --username admin \
    --firstname Peter \
    --lastname Parker \
    --role Admin \
    --email spiderman@superhero.org

# start the web server, default port is 8080
airflow webserver --port 8080

# start the scheduler
# open a new terminal or else run webserver with ``-D`` option to run it as a daemon
airflow scheduler

# visit localhost:8080 in the browser and use the admin account you just
# created to login. Enable the example_bash_operator dag in the home page
1.1.2 airflow使用mysql
使用与MySQL, Postgres和SQLite作为支持的后端的SqlAlchemy,将Airflow构建为与其元数据进行交互(SQLite主要用于开发目的)
#1. 创建airflow元数据库
mysqlCREATE DATABASE airflow CHARACTER SET utf8 COLLATE utf8_unicode_ci;
CREATE USER 'airflow' IDENTIFIED BY 'airflow';
GRANT ALL PRIVILEGES ON airflow.* TO 'airflow';
flush privileges;
#2. 修改airflow.cfg文件
#$AIRFLOW_HOME/airflow.cfg文件中修改
# 配置mysql
sql_alchemy_conn = mysql+pymysql://airflow:airflow@127.0.0.1/airflow
# 配置支持并行性的工作器
executor = LocalExecutor
1.2 docker运行
具体可参考: [doc]
# 1. 获取docker-compose.yaml
curl -LfO 'https://airflow.apache.org/docs/apache-airflow/2.1.0/docker-compose.yaml'
#2. docker-compose up
二、airflow基本使用
2.1 dag demo
#$AIRFLOW_HOME/dags/tutorial.py
from datetime import timedelta
# The DAG object; we'll need this to instantiate a DAG
from airflow import DAG
# Operators; we need this to operate!
from airflow.operators.bash import BashOperator
from airflow.utils.dates import days_ago
# These args will get passed on to each operator
# You can override them on a per-task basis during operator initialization
default_args = {
'owner': 'airflow',
'depends_on_past': False,
'email': ['airflow@example.com'],
'email_on_failure': False,
'email_on_retry': False,
'retries': 1,
'retry_delay': timedelta(minutes=5),
# 'queue': 'bash_queue',
# 'pool': 'backfill',
# 'priority_weight': 10,
# 'end_date': datetime(2016, 1, 1),
# 'wait_for_downstream': False,
# 'dag': dag,
# 'sla': timedelta(hours=2),
# 'execution_timeout': timedelta(seconds=300),
# 'on_failure_callback': some_function,
# 'on_success_callback': some_other_function,
# 'on_retry_callback': another_function,
# 'sla_miss_callback': yet_another_function,
# 'trigger_rule': 'all_success'
# 'catchup': false
}
dag = DAG(
'tutorial',
default_args=default_args,
description='A simple tutorial DAG',
schedule_interval=timedelta(days=1),
start_date=days_ago(2),
tags=['example'],
)
# t1, t2 and t3 are examples of tasks created by instantiating operators
t1 = BashOperator(
task_id='print_date',
bash_command='date',
dag=dag,
)
t2 = BashOperator(
task_id='sleep',
depends_on_past=False,
bash_command='sleep 5',
retries=3,
dag=dag,
)
dag.doc_md = __doc__
t1.doc_md = """\
#### Task Documentation
You can document your task using the attributes `doc_md` (markdown),
`doc` (plain text), `doc_rst`, `doc_json`, `doc_yaml` which gets
rendered in the UI's Task Instance Details page.

"""
templated_command = """
{% for i in range(5) %}
echo "{{ ds }}"
echo "{{ macros.ds_add(ds, 7)}}"
echo "{{ params.my_param }}"
{% endfor %}
"""
t3 = BashOperator(
task_id='templated',
depends_on_past=False,
bash_command=templated_command,
params={'my_param': 'Parameter I passed in'},
dag=dag,
)
t1 >> [t2, t3]
2.2 运行dag
python $AIRFLOW_HOME/dags/tutorial.py
2.3 验证dag
打开web服务器,可以在dags中看到 tutorial

点击tutorial,进入查看

命令行元数据验证tutorial文件
# print the list of active DAGs
airflow dags list

# prints the list of tasks in the "tutorial" DAG
airflow tasks list tutorial

# prints the hierarchy of tasks in the "tutorial" DAG
airflow tasks list tutorial --tree

# testing print_date
airflow tasks test tutorial print_date 2015-06-01

# testing sleep airflow dags test [dag_id] [execution_date]
airflow tasks test tutorial sleep 2015-06-01
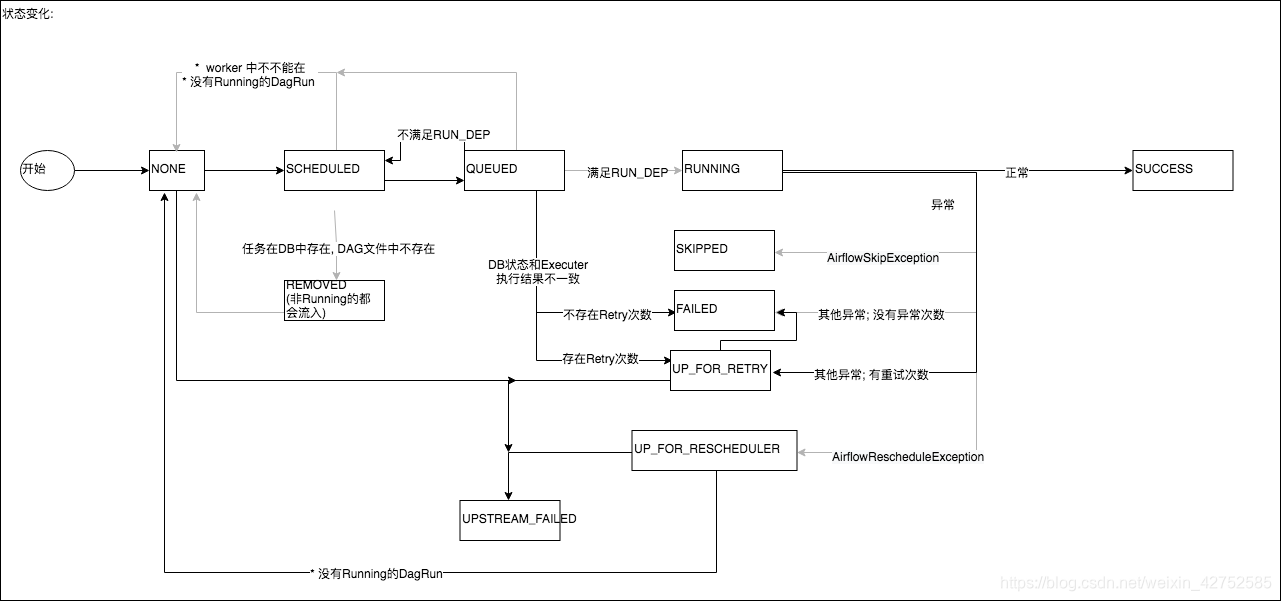
2.4 airflow task状态
对应task_instance表的state字段
no_status:scheduler调度ti,初始化状态:
queued:scheduler将ti发送到队列后,等待pool的slot资源:
running:worker任务执行开始:
retry:worker任务执行失败后按配置的重试次数进行重试;
success:worker任务执行成功;
failed:worker任务执行失败/超时:
skipped:一般分支节点下游的某个分支会存在跳过的情况;
up_for_retry:task已failed但尚未进入retry状态;
up_for_reschedule:主要针对sensor,等待被再次调度,避免直接执行占用worker的slot;
upstream_failed:依赖的上游task执行失败后,下游task都标记为upstream_failed;

2.5 Operators 使用
2.5.1 BashOperator
bash_operator_task = BashOperator(
    task_id='bash_operator_task',
    bash_command='echo "run_id={{ run_id }} | dag_run={{ dag_run }}"',
    dag=dag,
)
2.5.2 PythonOperator
def print_context(ds, **kwargs):
    """Print the Airflow context and ds variable from the context."""
    print(kwargs)
    print(ds)
    return 'Whatever you return gets printed in the logs'


python_operator_task = PythonOperator(
    task_id='python_operator_task',
    python_callable=print_context,
    op_kwargs={'data': 'test.....'},
    dag=dag,
)
#op_args , op_kwargs 给Python方法传参
2.5.3 PythonVirtualenvOperator
使用PythonVirtualenvOperator可以在新的Python虚拟环境中执行Python可调用对象。
def callable_virtualenv():
    """
    Example function that will be performed in a virtual environment.

    Importing at the module level ensures that it will not attempt to import the
    library before it is installed.
    """
    from time import sleep

    from colorama import Back, Fore, Style

    print(Fore.RED + 'some red text')
    print(Back.GREEN + 'and with a green background')
    print(Style.DIM + 'and in dim text')
    print(Style.RESET_ALL)
    for _ in range(10):
        print(Style.DIM + 'Please wait...', flush=True)
        sleep(10)
    print('Finished')


virtualenv_task = PythonVirtualenvOperator(
    task_id="virtualenv_python",
    python_callable=callable_virtualenv,
    requirements=["colorama==0.4.0"],
    system_site_packages=False,
    dag=dag,
)
2.6 跨DAG依赖
当两个DAG具有依赖关系时,值得考虑将它们组合成一个DAG,这通常更容易理解。airflow还可以更好地可视化表示同一DAG上的任务的依存关系。但是,有时将所有相关任务放在同一DAG中有时是不切实际的。例如:
两个DAG的时间表可能不同。例如,每周DAG的任务可能取决于每日DAG的其他任务。
不同的团队负责不同的DAG,但是这些DAG具有跨DAG的依赖性。
一个任务可能依赖于同一DAG上的另一个任务,但取决于另一个execution_date。 ExternalTaskSensor可用于在不同DAG之间建立这种依赖性。与一起使用时ExternalTaskMarker,清除依赖的任务也可能在不同的DAG中发生。
#使用ExternalTaskSensor可以使DAG上的任务等待特定DAG上不同DAG上的另一个任务execution_date。
parent_task = ExternalTaskMarker(
    task_id="parent_task",
    external_dag_id="example_external_task_marker_child",
    external_task_id="child_task1",
)

child_task1 = ExternalTaskSensor(
    task_id="child_task1",
    external_dag_id=parent_dag.dag_id,
    external_task_id=parent_task.task_id,
    timeout=600,
    allowed_states=['success'],
    failed_states=['failed', 'skipped'],
    mode="reschedule",
)
2.7 管理变量 Variables
变量是在Airflow中存储和检索任意内容或设置作为简单键值存储的通用方法。可以从UI,代码或CLI列出,创建,更新和删除变量。Admin -> Variables (json 格式上传文件,后面可以在ui中修改)
from airflow.models import Variable
foo = Variable.get("foo")
foo_json = Variable.get("foo_baz", deserialize_json=True)
三、 Airflow 分布式
3.1 本地环境
airflow 2.0.0
python3.7
3.2 airflow设置celery executor
#修改airflow.cfg文件,指定celery执行器,并修改相关配置
executor = CeleryExecutor
broker_url = redis://127.0.0.1:6379/0
result_backend = redis://127.0.0.1:6379/0
3.3 安装依赖
pip install 'apache-airflow[celery]'
pip install celery
pip install redis
3.4 启动worker
airflow celery worker

# 可以指定worker只执行某个队列的task,BaseOperator可指定具体的队列queue
airflow celery worker -q spark
3.5 关闭worker
airflow celery stop
3.6 启动celery flower, flower可以监视worker
airflow celery flower
3.7 执行过程

3.8 相关文档
https://zhuanlan.zhihu.com/p/44768244
4. docker部署dockerfile
FROM apache/airflow:2.7.3
USER root
RUN sed -i 's/deb.debian.org/mirrors.aliyun.com/g' /etc/apt/sources.list
RUN sed -i 's/security.debian.org/mirrors.aliyun.com/g' /etc/apt/sources.list
RUN apt-get update \
  && apt-get install -y --no-install-recommends \
         vim \
  && apt-get autoremove -yqq --purge \
  && apt-get clean \
  && rm -rf /var/lib/apt/lists/*
RUN ln -sf /usr/share/zoneinfo/Asia/Shanghai /etc/localtime && echo 'Asia/Shanghai' >/etc/timezone
RUN adduser airflow sudo
RUN sed -i /etc/sudoers -re 's/^%sudo.*/%sudo ALL=(ALL:ALL) NOPASSWD:ALL/g' && \
  sed -i /etc/sudoers -re 's/^root.*/root ALL=(ALL:ALL) NOPASSWD:ALL/g' && \
  echo "Customized the sudoers file for passwordless access!"
COPY ./requirements.txt /
RUN sudo pip install --no-cache-dir -r /requirements.txt  -i https://pypi.tuna.tsinghua.edu.cn/simple
USER airflow
 微信
微信
 支付宝
支付宝
